Welcome to the first of my studio lighting tutorials. In this on-going series of blog posts, I will be featuring some of my personal favourite images from my own portfolio and sharing all the info you need to recreate a similar look yourself. First up, is possibly my all-time favourite lighting setup. Why is it my favourite I hear you ask? Because it's super quick and super simple to get started with and the results can be stunning.
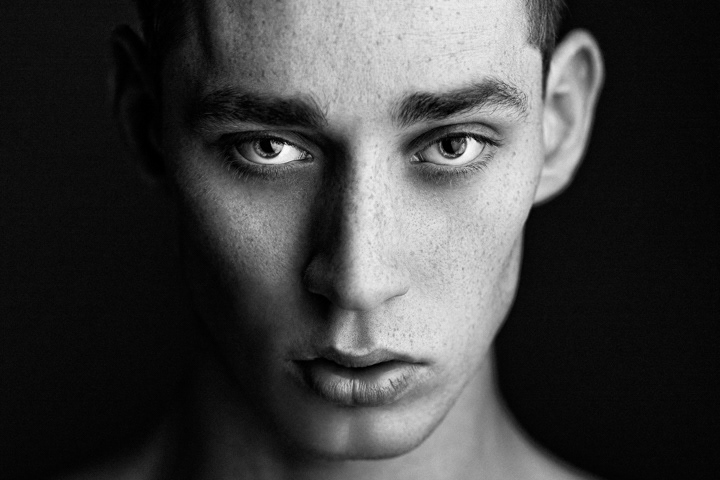
As you can see from the image above, the light is quite soft, yet starts to fall off dramatically as it travels to the camera left side of Models's face. You may also notice that although the camera left side of the face is mostly in shadow, there is a small triangle of illumination on his cheek. This look is commonly referred to as Rembrandt Lighting because Rembrandt (as well as other artists from the period) would often feature this lighting pattern in his paintings. This is probably due to the fact that back in times of yore, before speedlites, studio strobes and even photography were invented, portrait subjects would often sit in front of a window to be bathed in beautiful flattering soft light while the artist done his/her thing. In today's example we're going to use a strobe, but you could just as easily do this by positioning someone close to a window (check out the diagram below and just replace the softbox with a window).

GEAR
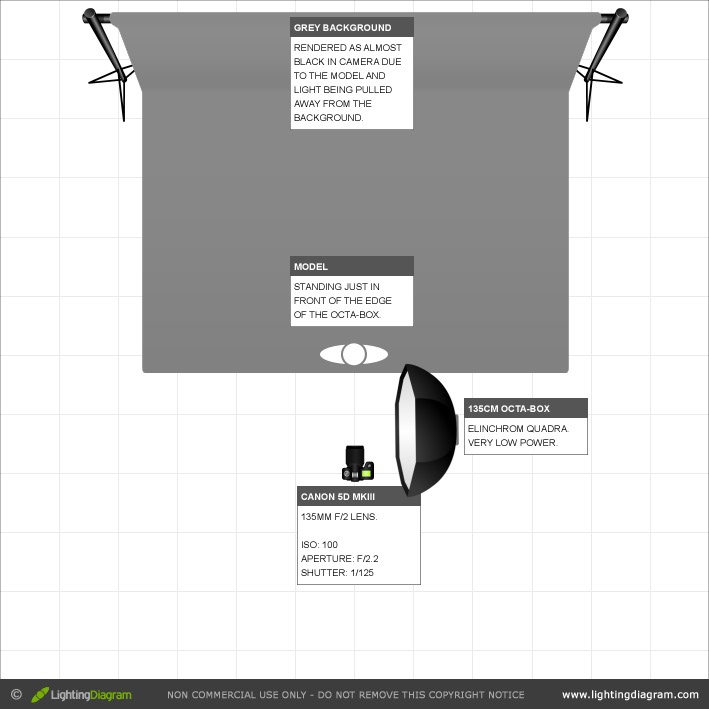
So, as you can see from our lighting diagram above, this is a very simple one light setup. I use Elinchrom Quadra lights, but any light that can output at a low power will do the trick. That includes speedlites. Also, any medium sized softbox will be perfect for this. You're going to be bringing the light in pretty close, so even a relatively small modifier will actually be quite large in relation to the subject.
WHAT IS SOFT LIGHT?
Soft light is not really about diffusion, it's about size in relation to your chosen subject. Y'know that ridiculously expensive piece of plastic you stick on the end of your speedlites that's supposed to answer all of your lighting prayers? Yeah, that doesn't soften anything. It just spits light out in all directions. The size of the light source is still quite small.
Think of it this way. The Sun is huge. It has a diameter of about 1,392,684 km, around 109 times that of our humble little planet Earth. Yet when we see it in the sky on a clear day it's tiny. Just a small yellow circle in the sky. On days like this, you'll notice that the sun casts strongly defined deep shadows.
Now think about a completely overcast day. You can't see the sun, but you know it's still there because it's bright outside. You may also notice that there are little to no shadows being cast. This is because the clouds have diffused the suns light, turning it into a much larger light source. Just like a softbox turns a bare strobe into a much larger source.
Anyways, my point is that even if all you have is a small softbox, you can still get a really softly lit headshot by bringing the light in as close as you can (making it larger in relation to your subject).
THE PROCESS
To start with, I always check what aperture I can get away with while still blocking out all of the ambient light in the room. With images like this one, I prefer to shoot in the f/2 to f/3.5 range on a telephoto lens (usually 85mm or 135mm) so that I can get a nice shallow depth of field. I set my ISO to 100, my shutter speed to 1/125 and then choose my aperture. Take a shot. You're looking for complete blackness. If you're still seeing some of your subject in the image you'll have to close down to a smaller aperture (I suggest doing this in 1/3 stop increments). I know in my studio I can sometimes get away with f/1.4 at 1/125 and ISO 50, but you'll have to work out the limits of whatever room you're working in for yourself using the above process.
To set up the light, I usually raise the flash head up to about face height of my subject. I then bring the softbox in really close, just shy of actually touching the shoulder, and positioned so that the light does not directly hit the subject (see the diagram above for exact positioning). This is called feathering the light. Basically, we're going to be using the edge of the light coming from our source rather than having it light our subject directly. This is what gives that pleasing gradient from highlight to shadow that you see in the image above.
So, now that you have your light and your subject perfectly in place it's time to switch on your light and preferred method of triggering. Set the power quite low and take a shot. If the exposure is too low, bump up the power on the light a little and take another shot to check, keep doing this until you have a decent exposure.
I chose to pull the Model (and the light) away from the background so that it would it fade away to (almost) black. This happens because there is little to no light actually hitting the background, and we have eliminated the ambient light in the room from affecting our exposure. This is just a personal visual preference that I chose to use for this particular image.
Once the exposure is nailed down, then it's time to start working with your subject and getting a great expression out of them, as well as a strong composition. The real hard work in my opinion.
TIPS
Always position the light on the side that your subject parts their hair. There are a couple of reasons for this. Firstly, for subjects with long hair parted on one side, positioning your light on the side where the hair is not parted will usually end up casting unwanted shadows from the hair. Secondly, it's been proven that most people actually instinctively part their hair on their preferred/good side.
When positioning your subject, put a strip of gaffers tape down on the floor indicating the point that your model cannot cross. If you don't have genuine gaffers tape it doesn't matter, just put something down to indicate the line that the person must not step over. This will prevent them drifting directly in front of the light, and throwing your exposure and shadow pattern way off.
Conclusion
If you made it this far, give yourself a pat on the back. We both made it through my first studio lighting tutorial relatively unscathed. I hope you liked the tutorial and really do hope you give it try. It's easy, so why not? If you have any questions about this lighting setup, please feel free to get in touch with me through the Contact Page.
Cheers,
B.
B.