I'm back with another studio lighting tutorial. This time I'll be going in depth on the subject of feathered light. What is it? What are the benefits and how exactly does one 'feather the light'?
FEATHER THE LIGHT
Many moons ago, back when I was first dipping my toe in the waters of studio lighting and off-camera flash techniques, there was one concept that I kept coming across in my research of how to create beautiful light. Blog posts, forum posts, video tutorials all preaching the virtues of simply 'feathering the light'. Great, but what the fudge does that even mean?
Well, to put it as simply as I understand it myself; it is a means of lighting indirectly by using the edge of the beam of light coming from your light source. Huh? Still doesn't make sense? Don't worry, it had me stumped for quite a while too. I got you covered though. It really is a concept that has to be explained visually.
HOW TO FEATHER A LIGHT
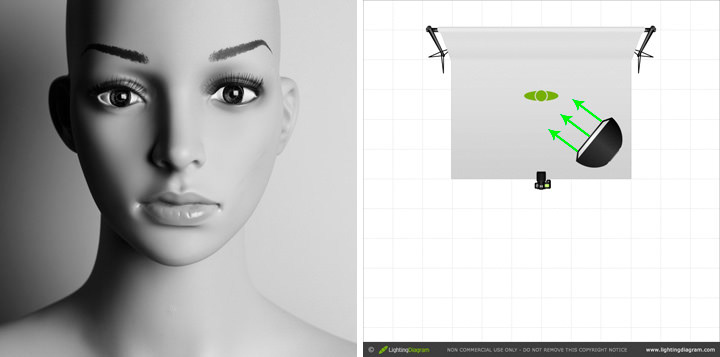
Check out the image below. It's your standard medium softbox at a roughly 45-degree angle lighting setup. This is probably the first setup most of us who become anyway curious about lighting attempt. Simply because it's easy, predictable and above all, effective. It's tried and tested and will always look pretty good.
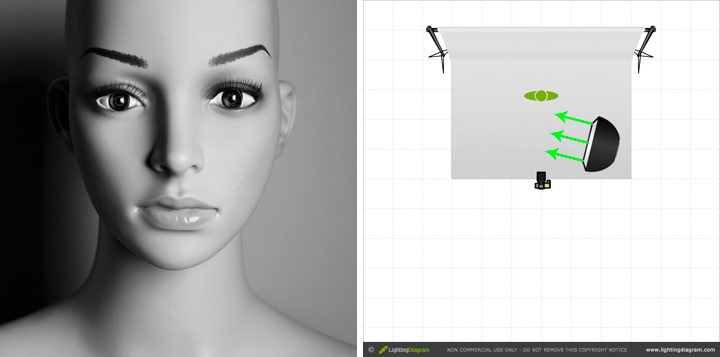
Now, how about the next image below? Looks fairly similar, doesn't it? Well, it should, as it uses almost the exact same setup as the image above. The only change I made was to rotate the face of the softbox a few inches towards me, then take a new flash meter reading and adjusted my camera's aperture to what my meter told me was a correct exposure.
I want you to pay very close attention to the lighting diagrams that accompany both images. But in particular, you need to scrutinise the diagram below this paragraph. The green arrows are pointing in the direction that our light is firing. Notice how the furthest arrow from the camera below is pointing towards the left shoulder of the subject. This arrow represents the edge of the beam of light coming from our source. Its trajectory is actually shooting passed the subject (only just). Taking a little bit of light spill into account, this means that the mannequin will essentially just get grazed by the edge of the light. This is why I needed a new meter reading. There is significantly less light now hitting the subject, so we need to compensate by either upping the flash power or opening up our aperture a little bit.
This is essentially how you go about feathering a light source. Seems pretty simple now I hope. But what exactly has changed when compared to the first setup?
SPOT THE DIFFERENCE
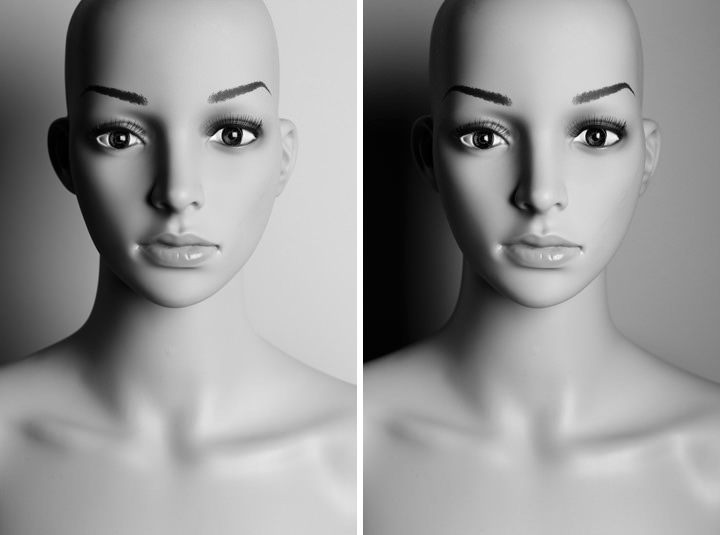
Okay, let's talk about that. But first, how about we play a little game of spot the difference?
SPOT THE DIFFERENCE
Okay, let's talk about that. But first, how about we play a little game of spot the difference?
You can click on the image below to make it larger and get a closer look at what's going on. Try not to scroll down too far or you'll spoil the answers!
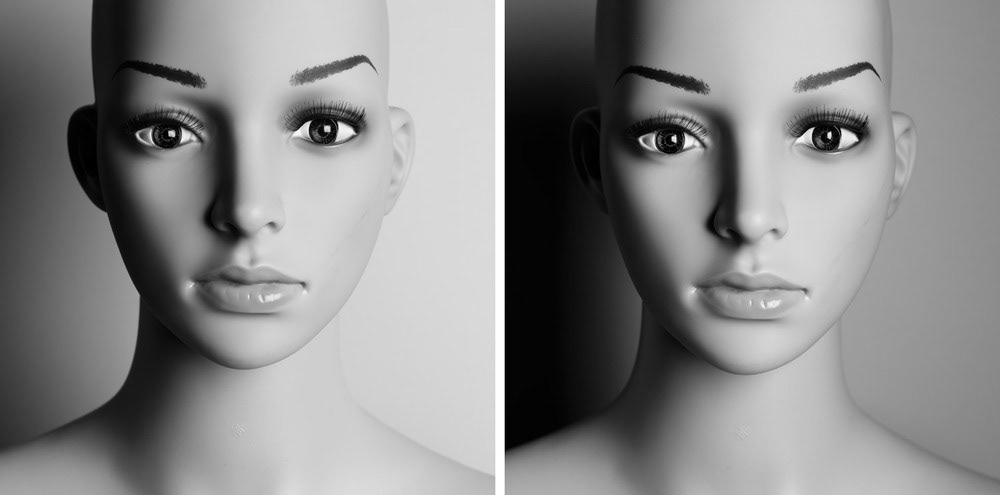
So, how did you do? Check out the image below for a visual reference of all the subtle little differences between direct and feathered light. And yes, they are quite subtle aren't they.
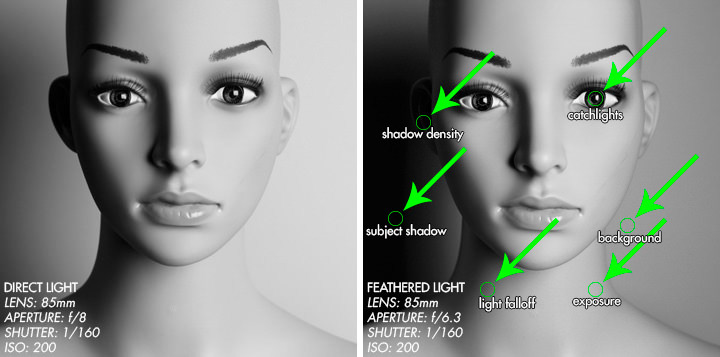
Okay, let's quickly do a rundown of all the changes that have occurred:
-Exposure: The illuminated areas of the face in the feathered light image have a more even exposure. Notice how the direct light image is quite bright to the right of the frame then gradually fades to shadow. The feathered light image maintains a more uniform exposure across the face.
- Light Falloff: This ties in with what I said about the exposure above. Notice how much softer the gradient from light to shadow is in the feathered light image.
- Shadow Density: The shadows in the feathered light example appear to be just a tad brighter. Almost like they are getting just a touch of fill light.
- Catch-lights: These are basically the reflection of your light source in the subject's eyes. A lot of photographers take their catch-lights very seriously as they can add some sparkle and life into the eyes. I always try my best to get some very prominent catch-lights in my images as the eyes just seem a bit dull without them in my opinion. In this example, you will notice the slightly different shapes of catch-lights we get simply by moving the light source a few inches.
- Background: The background in our feathered light example is rendered a little bit darker. This is due to the fact that there is no direct light hitting it to brighten it up.
- Subject Shadow: You may have noticed how the shadow in the direct light image appears to be a bit further away from the subject, and also seems to be a little less dense. This is because the light is wrapping around the mannequin to a certain extent and filling in the shadow. In the feathered light example, however, the indirect nature of the light means that it is, to some extent, illuminating slightly more from the front of the subject, and so the shadow gets pulled more towards the right of the frame. Also, for the very same reason, there is significantly less wrap around light, so it will get a little bit darker as well. Just as with any strong shadow like this, you could eliminate it by pulling the subject and light source away from the background. Of course, then your background will get darker. There's always a trade-off with lighting.
SOME THINGS TO WATCH OUT FOR
From my own testing in the studio, I've come to the conclusion that the feathering technique will really only work well with softboxes. Technically, you can feather any source, but the effects may not be desirable.
Shoot through umbrellas are pointless, as they will just throw light everywhere. Ditto for reflective umbrellas to a certain extent. I find there's a bit too much spill.
Snoots and grids are a bit too directional and produce such a narrow beam of light, that only a very small portion of your subject will be illuminated. Of course, if that's what you want, go wild. But I think, for the most part, a lot of us are not after that level dramatic lighting in our images.
CONCLUSION - WHY FEATHER THE LIGHT?
So at this point, you may be wondering, if the differences are so subtle, why bother? Well, I guess it all comes down to your own personal taste really. It's by no means an essential technique, and I'm sure there are plenty of successful photographers in the world who never feather their lights. It's one of a plethora of techniques out there and using it will ultimately come down to whether or not it fits with your own personal style and the look you want to achieve for a specific image.
I for one prefer the look of a slightly feathered light, with its more even exposure and some added fill, I feel it gets a little bit closer to looking like natural light. Also, in my own research of lighting techniques and after a lot of testing in the studio, I've come to the conclusion that learning about feathered light and the differences that even a slight change in the position of a light can introduce, have helped train my eyes to see some of the subtleties of light.
If you want to see some real-world examples of how I've feathered the light in the past, be sure to check out my Awesome Headshot Lighting and Coloured Rim Lights tutorials. Also, if you have any comments or questions about this tutorial, feel free to get in touch via the Contact Page.
Cheers :)
B.
B.